Showing posts with label Julia. Show all posts

Tuesday, March 5, 2013

Mac & Cheese Cook Off at Radio


On Friday, March 1, 2013, I went to Radio in Somerville with Sarah Sparks to gorge on mac & cheese. 

Nicole Tammaro hosted a Mac & Cheese Cook Off and Billy Joel cover night. This is the second live music/food competition she has done. The first one was a few months ago featuring chili and white trash music. We hope to see more live music mixed with food events, since those are two of our favorite things here at MassBytes!

We met up with Tony Gemba of BJP and MassBytes Food Quickie fame to eat our way through eight chef’s entries. We entered a small area set up away from the stage with a table of trays brimming with pasta and got to eating, while listening to some Billy Joel. Most of the dishes were delicious and unique. A few stood out in my mind as the best.

A buffalo mac & cheese with shredded chicken and blue cheese was amazing. It had a light buffalo sauce blended well with the chicken, pasta and cheese, not to heavy on any one flavor.

Another standout entry had chunks of prosciutto, with a thick creamy cheese sauce, and a hint of maple syrup. It was a hard choice but this one was my personal favorite.

One of the more interesting dishes was comprised of finely chopped broccoli, gorgonzola and topped with breadcrumbs. Quite different from the other flavors, and it really grew on me.

The final top one, in my opinion, was one of the simplest. Ziti with a thick creamy cheese sauce delivered a great traditional mac & cheese.


After we stuffed ourselves we submitted our ballots and waited for the announcement. The winner was the Buffalo Chicken mac & cheese, which was whipped up by Julia Nahmias of Food For The Band and a fellow contributor at MassBytes! Congratulations!

For more information about the music venue Radio: http://www.radiobarunion.com/

Friday, November 23, 2012

Vegivore Eats | Cream of Celeriac soup

 With this time of year upon us, the air getting nippy, our bellies begging by nightfall to just be full and warm -- let's make soup for dinner. I made a pretty divine cream of celeriac (celery root) to share with my family for the holiday yesterday.


 I realize I missed the opportunity to share this recipe with you prior to Thanksgiving, so you might've been able to make this for your Turkey Day crowd, but life has a funny way of stepping in to make sure you don't get anything done that you intended to do. C'est la vie. And also, oopsy.

Celery root is not much to look at.  NPR once put it best:
"Aboveground is a gorgeously symmetrical crown of green, celery-like growth radiating from the central knob to about 12 inches. However, pull up this pretty green crown and what you unearth looks like a troll's orb of warts and roots."
photo credit: wiveswithknives.net

 Once you are finished the tedious job of peeling the celeriac you have at your disposal a milky-white root vegetable resembling a turnip and tasting of celery, parsley and earth.

 A wonderful, vegetarian, perfect-for-Thanksgiving soup recipe posted after Thanksgiving is okay, right?  Will it help sell it if I tell you this just might be THE best soup to pass your lips?  Full of celery root and aromatics; wine and spice. Pureed and velvety.

 We still have all winter, friends,..and celeriac will be in season and locally available the whole time*.  December holidays are around the corner; keep this recipe in yer back pocket!  Belly up to your tureen of choice, just make sure this is what's inside.

My lovely assistant, also known as my everlovin' Mama

 CREAM OF CELERIAC SOUP
Serves 6-8

2 Tbs butter
2 lbs celeriac, peeled and cut to 1" dice
1 small fennel bulb, cut to 1" dice
2 Bermuda onions, diced
1 c celery, chopped (reserve leaves from tops)
2 garlic cloves, minced
1/2 tsp celery salt
1 tsp lemon pepper
pinch of cayenne pepper, more to taste
1/2 c dry white wine
5 c vegetable stock
1 c whipping cream

In a heavy-bottomed pot, melt the butter over medium heat.  Add prepared celery root, onions, fennel and celery.  Sprinkle with salt and pepper**, cover the pot and let steam for about 20 minutes (or until tender), stirring twice.
Add in the garlic, celery salt, lemon pepper and cayenne.  Stir a minute before adding the wine. Cook the mixture down, until most of the liquid evaporates.
 Add in the vegetable broth.  Bring to a boil, turn down the heat and let it simmer for about 15 minutes.
 Use your immersion blender to puree the soup entirely.
Stir the cream and simmer another 5 minutes.

Ladle into bowls, top with a grind of black pepper, minced celery leaves and a touch of olive oil before serving!

...

 *PRO TIP: Most supermarkets stock celery root/celeriac.  However, vegetables are so much more fresh and flavorful when they come from closer to home!  Try Parker Farm (Lunenberg) and Hutchins Farm (Concord) to have the chance to get your hands on the best celeriac in the region.

 **PRO TIP: I primarily use white pepper in this soup, just so guests aren't secretly wondering what the black specks are.  A grind of black pepper on the top is ok, tho -- contrast  :)

Thursday, November 1, 2012

Vegivore Eats | Icelandic crepes with persimmon jam

I picked up three Fuyu persimmons at the market yesterday and spent a considerable amount of time, well, considering them.


This marks the first time I've ever bought persimmons, let alone eaten them or cooked with them, and I really didn't know what to expect.  Anything I've since read on these orange, seasonal fruits leaves a lot to interpretation: eat them hard/eat them soft, peel them/don't.
Peeled one, tasted it: like an apple, but with less sharp bite.  A soft, mellow flavor.  Not juicy when slightly underripe like mine were, and while I've read that some persimmons have large black seeds -- these did not.

When I woke up this morning I was still thinking about what to do with these guys, but a need for breakfast was more pressing.  Then it hit me: I'd do something with these persimmons FOR breakfast.  I decided to make Icelandic crepes filled with a persimmon jam. For an "Icelandic" crepe I take a standard French flour-butter-sugar-egg-salt crepe batter and add baking soda/powder (for tenderness and leavening, respectively) as well as spices.  Traditional French crepes kind of need something inside to taste their best but these are almost a meal in themselves, hearty and filling -- like a spicy pancake.  Despite being good on their own, though, I had the idea to fill them with the persimmon jam spiced with cardamom and lemon. Not only did I think the crepes would be the perfect, crispy and airy partner for such a thing, and that the cinnamon and nutmeg of the crepes would be just the right complement to the cardamom in the jam, but I also figured that jam would be a rather non-scary introduction to a new-to-me fruit.

Making crepes...takes some practice.  It helps if you have a crepe pan (I do not), but any shallow 8-10" skillet will work just fine as you get the hang of what you're doing.  The goal is to get the batter layer even and thin and to flip at just the right time -- too early and your crepe will fold and rip, and too late it'll burn.  Frustrating. Save yourself some rage -- pick up a narrow spatula or keep a wide knife nearby to help with the flip. Prepare to sacrifice one or two (or, like, five) to the Norse gods -- the recipe below makes enough crepes for plenty of mistakes, and in the PRO TIPS below I offer a failsafe technique if the classic technique isn't working for you and you justwantittoworkalreadydammit.

The end result was delicious; decidedly autumnal. The pectin-free persimmon jam was sticky, rich and decadent, just enough to be eaten right away without any leftovers. I found myself licking the spoon. Even the failed crepes, crumpled and/or dark, were still excellent for sating my hunger even though not photogenic. Had to eat something while waiting for those batch stars to present themselves!  I came away from this experience with a full belly (the quart of cold milk I enjoyed with these helped with that, I'm sure) and a winning new fall recipe in the books -- warm spices, zesty and alive on this cool morning.


ICELANDIC CREPES WITH PERSIMMON JAM
Enough batter for 15-18 crepes
Enough jam for 8-10 crepes ;)

CREPES:
1/4 c salted butter
2 large eggs
1 3/4 c milk
2 Tbs sugar
1/2 c flour
1/2 c whole wheat pastry flour
1/2 tsp baking powder
1/4 tsp baking soda
1 tsp cinnamon
3/4 tsp ground nutmeg

JAM:
2-3 ripe persimmons, peeled and pureed*
(should have a generous 3/4c)
1/2 c raw sugar (or turbinado/demerara)
1 3/4 tsp fresh lemon juice
1/4 tsp lemon zest
scant 1/4 tsp cardamom

Begin by making the crepes.  Melt the butter slowly in the pan you intend to use for the crepes.  When totally melted, set it aside off the  heat to cool while you whip up the crepe batter.

Whisk together the eggs, milk and sugar, then slowly add in the dry ingredients until completely combined.  Mix in the cooled butter and set the batter aside to rest for 10 minutes.

Turn your attention to the jam.  In a small saucepan, combine all ingredients and bring to a boil over medium heat.  Stirring for about 8-9 minutes, the mixture should come together nicely and fast.  Remove from the heat and set aside.

Back to the crepes. Heat over medium the (former) butter pan until a flick of water sizzles in the pan.

Pour in a scant 1/8c of batter and quickly tilt the pan all around so that the batter covers evenly and completely the bottom of the hot pan.  Let cook until the sides of the crepe get crispy and start curling forward, then flip as carefully as possible.  Let cook another minute or two, then slide or flip out onto a paper-towel lined plate.  Repeat with the rest of the batter, separating the finished crepes with paper towels.

Spread jam on the finished crepe and fold into quarters.  
Dust with powdered sugar if you're feeling really indulgent ;)

...

PRO TIP: Just can't flip that crepe?  At the moment you'd usually try to flip, stick it under a preheated broiler instead.  It'll bubble, look really dramatic, pull it out when just browned.  Loosen the edges with a knife and flip out onto a paper towel-lined plate.  If it won't flip out, carefully peel the crepe by its edge with your fingers as best you can. This might be hot, so watch out! 
Warning: you may get dark(er) spots with this method, because of the intense directed heat.  But it is failsafe!

* PRO TIP: Persimmons on the hard side and won't puree?  Stick 'em in the saucepan before the other ingredients and mash as the heat softens them, stirring occasionally.  Add the other ingredients when you've got yourself a nice juicy sorta puree.  Use an immersion blender if you're worried about texture!

Thursday, October 25, 2012

Vegivore Eats | Jumbo Sweet Potato Cupcakes (with BouRye-vanilla glaze)

  With the fall holidays upon us, it would be easy for me to say I made up this recipe in order to give to you a seasonal baked good recipe to prepare for your various gatherings. While I encourage such things I need to be honest with you and with myself: this recipe was created specifically to use up extra mashed sweet potatoes and cranberries. 

I picked up from Wilson Farm (Lexington) this week a ton of produce to use for FFTB's Fresh Shares and other personal cheffing clients, sweet potatoes and cranberries included.  Even after filling all client orders (whipped sweet potatoes, as well as pork cooked with fresh cranberries), I still had left about 3 cups of the peppered, maple sweet potato mash -- and a whole flat of cranberries.  Sure, I could eat these "sweeties" (orange version of mashies?) for days and simply freeze the cranberries.  Ooooor...I could bake with it all...

These cupcakes were modeled after pumpkin or squash bread/cake recipes that have worked in the past; I assumed that a starchy mass like sweet potato would probably work like a canned pumpkin or fresh puree.  The vitamin-rich root vegetable not only adds nutrition* and bulk but acts as a binder in this recipe.  Cake flour produces a delicate crumb, and cranberry simple syrup (and buttermilk, too) gives this cake a certain tart takeaway**.  The flavors of pumpkin pie add spice where there's already sweet and slight sour, and brown sugar adds molasses to the mix; dark and pungent.

That all sounded delicious (and tasted great, too) but I couldn't just stop there.  I needed...something else...to knock it out of the park.  So I made a BouRye-vanilla glaze.  BouRye, a marriage of bourbon and rye (offered exclusively by High West in Utah), brings to the party notes of smoke and caramel...nutty and alcoholic, blending seamlessly with the vanilla, and then again with the pecan garnish on top.

The cake turned out moist, soft and the prettiest orange color.  The flavor wasn't completely dissimilar to a pumpkin muffin but was not as sweet, and I didn't want to run to a tub of cream cheese and use the muffin purely as a vehicle, which is usually my first instinct with a pumpkin or squash baked good. 

Not a bad way to spend an afternoon -- a successful culinary experiment!


JUMBO SWEET POTATO CUPCAKES
Makes 6-8 huge honkin' cupcakes

3 c cake flour
1 Tbs baking powder
 1/2 tsp cinnamon
1/8 tsp ground ginger
small pinch nutmeg
smaller pinch cloves
3/4 tsp Maldon or other flaky salt
1 1/4 cups packed light brown sugar***
1/3 c butter, room temperature
2 eggs, room temperature
1 c cooked, mashed sweet potatoes
1 tsp pure vanilla extract (I used double-strength)
1/3 c cranberry simple syrup or High West BouRye***
3/4 cup buttermilk

Preheat the oven to 350 degrees.  
Line a jumbo muffin pan (or two, if you have 6-cavity ones) with papers and set aside****.

In a large bowl, whisk together the first 7 ingredients (flour through salt) and set aside.

In a second large bowl, cream together the butter, sugar and eggs until fluffy, then add the sweet potatoes, vanilla and simple syrup and mix well (You'll have lots extra simple syrup from the linked recipe...delish in soda or cocktails).  

Add a third of the flour mixture, mix well, then add another third and mix well, add the buttermilk and mix well, then finish with the last third of the flour mixture.

Fill the baking cups and place in the preheated oven.

Bake for 25-30 minutes, starting to check on them after 25 minutes. 

Remove from the oven when the tops look done (they should be domed and not wet at all), and cool in the pan for about 5 minutes before removing to a rack.

Cool completely before glazing.

...

BOURYE-VANILLA GLAZE
Enough for the jumbo cupcakes and then some!

1 c powdered sugar
1/8 c heavy cream
1 tsp BouRye
1/2 tsp pure vanilla extract
1/8 tsp table salt
1/4 tsp cinnamon

Mix all ingredients together.

Hold the cooled cupcakes upside-down and one by one dip the tops in the glaze, turning to coat completely.

To finish this decadent autumn dessert even more decadently, garnish with a pecan half each.

...


*PRO TIP (more like FUN FACT):  One baked sweet potato gives you 400% of your daily requirement of Vitamin A!

**PRO TIP: Replace the cranberry simple syrup with an equal amount of BouRye.  The flavor will be much darker but equally as tasty -- I tried this, too :)

***PRO TIP: If using extra BouRye instead of cranberry simple syrup, adjust the sugar to 1 1/2 cups.  Whiskey adds a lot to flavor but not sweetness!

****PRO TIP: From a distance of about two feet, spray the insides of the liners with PAM to keep them from sticking to the cupcake.

PRO TIP:  I recently learned the correct way to eat a cupcake.  This strategy is ideal for this cupcake.  That way, when you bite into it, you get the whole world of flavors all together!

Thursday, October 4, 2012

Vegivore Eats | Broccoli, Cauliflower and Cheddar Chowder

Does anyone remember the last time we really saw the sun?  I mean, I'm fine with this rain, don't get me wrong (reminds me of living in the wondrous Pacific Northwest), but the darkness and gloom make me want to burrow; to stay warm.  Put on my slippers and call it a day...as soon as I wake up.  Under covers and pajamas forever!
But that's not how normal, functioning members of society operate, so up and dressed we get, ready to face the (albeit cloudy) day ahead.
It's days like today I feel especially lucky that I get to cook for a living (and generally, from home).  I might have three burners going for business, but there's still that one open for the possibility of whatever it is I'm in the mood for.  And today I'm in the mood for soup.
This is not a particularly difficult dish to make, but it does have a secret ingredient that makes it different than most recipes, higher in vitamin C and fiber than most recipes, creamier than most recipes while still lower in fat and even lower in sodium than most recipes (by as much as 35%!).

Using broccoli from Kimball Fruit Farm, homemade vegetable stock, heady sharp cheese, fresh herbs, organic cauliflower and canned Great Northern beans (secret ingredient alert!), this chowder is a mainline to silken vegetarian nutrition.  Fills you up to the top and keeps you there longer than the takeout dinner you'd planned on. For something with only a handful of major ingredients, the flavor is unexpectedly big.

Served in an Au Bon Pain bread bowl because why not.  The staff totally thought I was weird buying a bowl without soup.  ..."Dudes, I need the bowl for reasons, okay"

BROCCOLI, CAULIFLOWAH AND CHEDDAH CHOWDAH
serves 6-8

1 Tbs olive oil
1 large yellow onion, chopped
4 cloves of garlic, sliced*
1 head of broccoli, cut into florets (about 1/2lb, 3-4 cups)
1 head of cauliflower, cut into florets (about 1/2lb, 3-4 cups)
1 tsp each fresh tarragon, oregano, rosemary and thyme
3 cups vegetable stock, divided
1 cup water
14oz can of Great Northern beans, drained and rinsed
1 cup fresh-grated extra sharp cheddar, plus extra for garnish
salt and pepper to taste

Heat the olive oil in a heavy-bottomed soup pot over medium-high heat.  When shimmering, add the onion and garlic and stir occasionally for a few minutes, infusing the oil and softening the onion.

Add your broccoli and cauliflower florets, as well as the herbs, and cook them in the essentially dry pot for a few minutes, stirring occasionally before adding 2 cups of stock (add it when you get nervous that the pot is *too* dry).  Let the stock come to a boil, then cover and cook for approximately 7 minutes -- florets should be tender.

Stir in the rinsed beans, the cheese and some salt and pepper.  Use an immersion blender to puree the soup entirely.  Thin with additional stock as needed. Salt and pepper to taste.
Transfer to bowl, garnish with extra cheese (or some sour cream, yum) and serve warm.

...

*PRO TIP: slice your garlic vs. mince it to maximize the surface area and promote browning vs. burning.


Thursday, September 20, 2012

Vegivore Eats | Pasta Romanesco

Romanesco, in many ways, is nothing fancy.  It tastes like a cross between broccoli and a cauliflower.  The florets' cooked consistency is vaguely reminiscent of asparagus tops and the preparation nearly identical to other vegetables in the same family; clusters of buds on one main stalk.  Romanesco might be something you've never seen before, but is at once familiar, and is easy to use in place of other vegetables in recipes.  The real reason to snatch this up, however, is because it's perfectly and geometrically visually appealing.  Here is what makes romanesco fancy, a vegetable that begs to be photographed just as much as it does to be eaten.

"Imagine the psychedelic love child of broccoli and cauliflower with lime-green British punk hair, and you have something close to romanesco." -- Mario Batali (photo credit: The Village Voice)
This is fractal food at its finest.  The hybrid veggie with the natural chartreuse whorls was first documented in the 16th century -- one might say the romanesco is the traditional Brassica vegetables' elegant, grandstanding Italian cousin.
Romanesco probably only wears Versace.  Fancy, sassy b. (photo credit: Brooklyn Farmhouse)
 As usual, I recommend roasting for any first-time encounter with an unusual vegetable, as I think that the gentle caramelization brings out most natural ingredients' best flavors.  I didn't stray from this technique with this little head of romanesco (from Allandale Farm, Brookline), especially since I was already craving pasta and garlicky cream sauce and thought the oven-kissed florets would make a fine addition (and blog photo opp, huzzah). Especially when roasted together with some orange cauliflower, whole garlic cloves, strips of red bell pepper and French Citrus Fennel Sea Salt (from Saratoga Olive Oil Co., a gift from my Mom), this dish sang when it came together.  

Ready for the oven.
  For being so un-fancy in so many ways, roasting romanesco's spiky edible flowers adds something extraordinary to an otherwise pretty ordinary dish of cheesy pasta and veggies; sweet, exotic, tasting of the heat waves and cool nights associated with its short late summer season.


PASTA ROMANESCO
The perfect recipe for 1, maybe 2, whether it's for a regular lunch on the run...or for someone still unsure about trying something new-to-them like romanesco and wanting a "safe" vehicle in which to try it.

 1/3 lb head of romanesco, cut into florets
1/3 lb head of orange cauliflower, cut into florets
1/2 red bell pepper, cut into thin strips
2 garlic cloves, skins on
olive oil
French Citrus Fennel Sea Salt*
freshly ground black pepper
 1/3 lb wide egg noodles
2 tsp cream
1/4c vegetable broth
1/8c + 2 Tbs finely grated Romano cheese


Preheat the oven to 400.  Arrange the first four ingredients on a foil-lined baking sheet, drizzle with olive oil and sprinkle with the salt and pepper.  Toss to combine.  Bake in the preheated oven for about 20 mins (the romanesco should give easily when pierced with a fork but should not be in danger of falling apart).

In the meantime, cook the noodles til al dente in a pot of generously salted water.  Drain and set aside for the time being.

When your veggies are out of the oven, wait til the garlic cloves are cool enough to handle, squeeze them out of their skins and mash them.

Combine together the roasted veggies, garlic paste and pasta.  Add the cream and 1/8 c of cheese and add the broth in splashes, stirring in just enough to make a thin sauce.  Drizzle some extra olive oil over the top and scatter the last 2 Tbs of the cheese over the top.

.....

*PRO TIP: I realize that not everyone's Mom buys them seasoned salt, ha.  Substitute: kosher salt.  Stir in 1 Tbs lemon zest at the end.


Thursday, September 13, 2012

Vegivore Eats | English Lavender-Citrus Bundt Cake

Lavender: not just a pretty purple flower!  This cousin of the mint family is also a hardy, flavorful culinary herb.  It seems odd, and maybe a little scary, to put something in your food that could just as easily go in a bath product or sachet, but adding the dried buds in moderation to baked goods gives them a certain something that diners can't put their finger on, something lightly herbal that adds just the right amount of perfume to the recipe.

Take this cake for example.  A tablespoon of dried blossoms (from The Herb Lyceum at Gilson's, Groton, MA) infuses the cake with this incredible "green" taste, pairing beautifully with the lemon and orange flavors and allowing its front-and-center nature to be tempered by the tangy yogurt within and the honey glaze on top.


It's truly a winner.  Moist, with excellent crumb structure and the most subdued of full flavors, this cake tastes of sweet citrus flowers, pine and rosemary. Also -- what can I say -- I like big Bundts and I cannot lie!  The dramatic size makes quite the lasting impression -- one recipe will feed 12-16 people at once.  Combining flavor with the calming aromatherapy and infusion benefits of lavender, it's the perfect end to a progressive or multi-course meal. Perhaps one of the better cakes I've ever made, nevermind tasted.


ENGLISH LAVENDER-CITRUS BUNDT CAKE
serves 12-16

For the cake:
vegetable shortening for the pan
3 cups cake flour*
1 tsp baking soda
1 1/2 tsp baking powder
1 stick salted butter
1 stick unsalted butter
1 1/4 cups granulated sugar
1 Tbs dried lavender flowers
 4 eggs, lightly beaten
1/2 tsp orange extract
1 c strawberry Greek yogurt
1 Tbs lemon zest


*IMPORTANT -- have your butter, eggs and yogurt at room temperature before beginning, about 40 minutes out of the fridge*

For the glaze:

2 Tbs orange blossom honey
1/2 cup powdered sugar, plus extra for finishing
1 Tbs fresh-squeezed lemon juice

First, preheat your oven to 325.  

Generously grease a 10 or 12-cup Bundt pan (full size) with vegetable shortening.  Don't use butter!  The shortening will allow your cake to eventually release from the most complicated of cake pans.  Add some flour to the pan and rotate it, flouring all the greased surface and tapping out the excess.  Set aside.

In a small bowl, whisk together the cake flour, baking soda and baking powder.  Set aside.

Using your hand mixer on low (with beater attachment), cream the butter for about a minute.  It should be light yellow and fluffy.  Add the sugar and the lavender, and continue to mix on low for another few minutes, scraping down the bowl's sides with a spatula as needed.

Add in the eggs, approximately one at a time, while still having the mixer running, then add the orange extract.

Next, beating continuously, add a third of the flour mixture, followed by half the yogurt, followed by another third of the flour mixture, followed by the rest of the yogurt, ending with the last of the flour. Stop to scrape down the bowl as necessary.

Fold in the lemon zest.

Plop the batter into your prepared pan, creating a kind of ravine around the center hole, ensuring that in the end the middle won't rise higher than the sides.

Bake one hour in the preheated oven.

Cool 15 minutes on a wire rack with parchment paper underneath.

During that time, make your glaze.  Gently heat the honey in a saucepan, so it gets all melty and easier to pour.  Add in the powdered sugar and lemon juice and stir until the glaze comes together.

After 15 minutes is up, it's time to unmold your cake (say a little prayer...but you shouldn't need it if you prepared your pan properly).  Carefully flip the pan over and give a good shake (close to the rack!). The cake should nearly effortlessly come out. If it doesn't, whack the bottom a few times with something like a wooden spoon.

Once the cake is out and sitting pretty, either drizzle the glaze or use a pastry brush to apply it all over the cake.

Cool at least 2 hours before slicing and serving.

.....

PRO TIP: No cake flour?  Save yourself a trip to the store and the extra expense/pantry space by adding 2 Tbs corn starch to a 1-cup measuring cup, then filling/leveling the rest of the cup with all-purpose flour.  Voila, that's one cup of cake flour.

Thursday, September 6, 2012

Vegivore Eats | Creamy, Spicy Mushroom Soup

Sometimes with recipes (and everything else) it is just plain nice to simplify.  It is easy, when cooking without a recipe or riffing on someone else's, to end up with an ingredient list 25 items long...the result of adding a pinch of this, a pinch of that, adjusting with something else, adding one more thing, etc. Truly, though, the best recipes are high-quality ingredients, only a few of them, prepared well and beautifully.  That's all.  When I cook like this, I like to imagine I'm back in France, slowing down and savoring; preparing something so dressed-down and yet still so elegant.

What I envisioned with this simple-enough soup recipe was to create a bridge.  Labor Day has passed, wardrobes are starting to switch over (see also: long sleeves with shorts), and it's time to bridge the gap between summer and fall.  Mushrooms lend themselves beautifully to this idea, earthy and plump, reminding us that the bounty of the summer is nearly past but that the harvest isn't over.  This upcoming season is still about digging in the dirt: harvesting root vegetables, tilling old soil, keeping cold weather crops frost-proof until they're ready to pull around New Year's.  It's also a time when plants are beginning to die, returning to the earth from whence they came...and the opportunistic mushroom is there to partake and flourish in this decay. The fungi is also known to have medicinal properties; modulate immune responses, preparing our bodies for the onslaught of Indian summer cold season.  B vitamins, selenium, potassium.  Eat them cooked, eat them fresh: the perfect bridge, the mushroom.  Keep us healthy, keep us mindful.

I chose to use Cremini and Shiitake mushrooms (from Pennsylvania) in this 10-ingredient soup. The meatiness combined with the lack of huge gills made these a great candidate (as did the fact that they are only a few bucks a pound); I had these in mind long before hitting the market.  Especially with this recipe involving a long simmer -- they'll hold up and won't just brown and ick apart during the cooking process.
Vegetable stock and heat all together deepen the mushrooms' taste, and onions and Poblano peppers add flavor as well as bulk (and heat) to the broth.
Lemon thyme and oregano balance the darkness of the flavors I already had going on.  The brighter herb taste not only lightens the whole thing but also keeps us in the season we are in. ...Don't rush towards fall; let's linger a little right where we are, shall we?
A dollop of sour cream towards the end coooooools down this party, and a splash of the heavy cultivated wine, Amontillado sherry*, is excellent punctuation at the end.

Succulent, rich, creamy and lip-smacking good, your eyes might just roll back in your head at first taste.  And again with the notion of France, the food so welcoming and abundantly prepared.  Daydreams of Paris.  Serve with crusty bread for the full effect.**

Iggy's (Cambridge, MA) Francese bread.  OH MY GOD, SO GOOD.  Goodbye, loaf, I hardly knew ye. 

CREAMY, SPICY MUSHROOM SOUP
Serves 4

3 Tbs butter
3 Tbs olive oiil
large yellow onion, thinly sliced
2 Poblano peppers, seeded and diced
1 lb Cremini and Shiitake mushrooms, de-stemmed and quartered (halve the little guys)
32 oz carton of vegetable stock
3 tsp lemon thyme***
1 tsp oregano
1/3c sour cream
2 Tbs sherry
salt and black pepper to taste

In a medium-sized pot, over medium heat, melt a tablespoon each of the butter and olive oil.  Add in your onions and stir occasionally for several minutes, softening them without browning them.  Add your diced Poblanos towards the end of this stage.  Don't worry, they'll cook.  Don't let your onions turn to mush, just move on after a minute.

Add your mushrooms and the rest of the butter and olive oil.  Turn your heat to medium-low. Let 'em sizzle in there, stirring, let that amazing Maillard reaction do what it does best: caramelize the mushrooms.  There's a lot of moisture in the mushrooms, so you're looking for the water to be released, you'll see that at the bottom of your pot.  Stir through this until the pot is dry and the mushrooms have taken on a gorgeous reddish-brown color.

At this point add 3 1/2 cups of the vegetable stock and the herbs.  Turn your heat to medium (or even medium-high) and bring to a boil, stirring occasionally.  Then, reduce the heat to low and simmer for 45 minutes.

Stir in your sour cream and then your sherry.  Take the soup off the heat and allow to cool for about 15 minutes, then use a blender/food processor/immersion blender/implement of destruction to puree the soup entirely.  You may have to do this in batches.  That's better than making a giant mess and/or burning yourself, so take your time.  Add broth to thin as necessary, blend thoroughly.

Season to taste.

.....

*PRO TIP:  Don't confuse cooking sherry (or way worse, sherry vinegar) with actual sherry.  You're gonna want to go real-deal with this recipe, since this ends up a predominant flavor.  Yes, it sucks to buy a big bottle of booze you may not just drink straight-up.  Therefore, I give you this, the Sherry Cobbler cocktail.  ...Indeed, that bottle will be used.  Try with lemonade instead of the sugar and fruit.  You're welcome.

**PRO TIP: Make this a complete meal by schmearing your bread with peanut butter.  The umami of the peanut butter and the mushrooms will actually go pretty well together, and you'll get protein to boot.

***PRO TIP: no lemon thyme?  Substitute with regular thyme, and squeeze some lemon into the near-finished soup -- after the long simmer but before the sour cream.

Thursday, August 23, 2012

Vegivore Eats | Bicolor Quinoa Salad (with roasted baby Hubbard squash)

The Hubbard squash is widely considered the largest variety of squash, a hard, blue-gray monster covered in warts and generally not-so-attractive...and intimidating to many when it comes to breaking it down and using it!  Usually these big 'uns are left to ripen on the vine to develop their hard shell, harvested before winter's first frost as large, unwieldy teardrop-shaped pumpkin replacements, but the late summer baby Hubbard squash offered at the farmer's market this week (Flats Mentor Farm, Lancaster, MA) could fit in my hand!  The skin wasn't über-tough yet; the flesh inside was a pale yellow, not yet the brilliant orange color of its adult form, and while the outside doesn't look so pretty -- the inside offers a sweet surprise to those willing to crack through to get in there!*  The Hubbard is the Beauty and the Beast of the squash world, if you will.


First making it to the U.S. (to Marblehead, MA, in fact) in the 1700s, this starchy, flaky and nutty squash variety most likely came from South America, arriving via ships returning from the West Indies, and was cultivated mostly for pies!  While I've never tried this way of eating it, I do find that the best way to cook up a Hubbard, baby or otherwise, is to roast it. This brings out its flavor, simultaneously subtle and strong, and its soft texture.  Using one method or another, get that thing in the oven!
High in vitamins A and C, and low in fat and sodium, the Hubbard plays well with so many different flavors.  In this recipe, with fresh bok choy and purple bell pepper (Dick's Market Garden, Lunenberg, MA), scallion (Hutchins Farm, Concord, MA), some spices, aromatics and quinoa, it becomes a hearty, colorful, Asian-inspired vegan (and gluten-free) entree that tastes of the garden and good health.

Served inside a Hubbard squash blossom (also from Flats Mentor Farm), the edible mama bloom from which the Hubbard grows.


BICOLOR QUINOA SALAD FEAT. HUBBARD SQUASH
feeds 1-2

1 baby Hubbard squash
olive oil, enough for pre-roast drizzling
kosher salt
2 t Chinese Five Spice
1/2c quinoa (any color will do, I used black and white because it's purdy and contrasting)
1 c vegetable broth
2 t sesame oil
1 large scallion, white and light green parts only, thinly sliced into rounds
1-2 cloves garlic, minced (how much do you like garlic?)
1/2" knob of ginger, minced
pinch of red chili flakes
 1/2 bell pepper (any color will do, I used purple), thinly sliced
 1/2lb bok choy, stems set aside for another use and leaves cut chiffonade
1 T tamari
1 t rice vinegar
Preheat your oven to 400. To roast your itty squash, slice it in half, drizzle the cut sides with olive oil, a pinch of kosher salt and sprinkle with the Chinese Five Spice.  Place cut-side down on a baking sheet and roast in the preheated oven for about 15 minutes.  When finished (should be soft and caramelized), set aside to cool and move on to your quinoa for the time being.

Heat a dry, medium-sized pot over medium-high heat.  Add your quinoa and stir now and then for the few minutes until the quinoa starts to "pop" and smell fragrant.  At that time, add your vegetable broth and a pinch of salt.  When it boils, turn the heat to low, cover and simmer about 20-25 minutes.  Take it off the heat at that point and leave covered for about 5 minutes before fluffing with a fork.  Set aside for the time being.

[ Is your squash cool?  Well then cube it up!  Some people eat the skin of winter squash, I always peel mine. Just too tough.  Post-roast is easier than pre. ]

Next, prepare your vegetables, the stir-fry way. Add your sesame oil to a wok (or skillet) and heat over medium-high.  Stirring frequently, add first the scallion and cook a minute.  Then add your garlic, ginger and chili flakes (stir!  stir!  The garlic will burn!).  About 30 seconds later, add the bell pepper.  A minute later, add in the bok choy, give it about 30 seconds, then kill the heat and add in the tamari.

Add your quinoa to the wok/skillet, as well as the Hubbard squash cubes and let it meld together in the residual heat.  Drizzle that eensy bit of rice vinegar over the top, and enjoy.

.....


*PRO TIP: I was able to use my 5" Nakiri knife to cut in half the little guy I picked out at the market, but to get in to larger varieties, put the thing in a bag and...drop it on the ground!

PRO TIP: buy your spices and quinoa in bulk at your local co-op -- try Harvest (Cambridge and Jamaica Plain)!


Thursday, August 9, 2012

Vegivore Eats | Blueberry-Jalapeno Skillet Cornbread

Cornbread purists, I know what you're thinking: Why mess with the traditional recipe when it's so damn delicious as it is?  I know you're thinking this because I used to be like you: anything straying from the ordinary was Not Allowed.
That said, as with many dishes, there's more to be done to cornbread to modernize it; give it a fresh perspective while still retaining all the good things we like about the original.  The crunch of a seared crust is a must, the cornmeal ought to melt into the batter while still presenting that crumbly crumb, and the whole thing should be solid and no longer batter in the slightest.

This recipe offers all that, and more.  Roasted off-the-cob corn kernels bring out the hazy taste of late summer, jalapeno pepper gives a new dimension of spicy oomph, sharp cheddar cheese nips at your taste buds in the background.  The real highlight here, though, are the blueberries.  Handpicked myself on Adam's Berry Farm (Burlington, VT), these Hardy Blue variety berries might seem like an odd addition but the mix of sour and sweet adds something this side of wonderful.


Above photo cred: OnePartGypsy, aka my talented sister
 ...And here's the part where you might be thinking, Cheese?  Hot pepper?  FRUIT?  What is Jules thinking?!  Try it. You'll like it.  There are a lot of corn and blueberry recipes, cheese and blueberry recipes, and blueberry salads -- the flavors will translate here.  This is a savory and creative way to use up (at least some of) the poundage of blueberries that comes hand-in-hand with this time of year -- without resorting to sugary baked goods.  The berries pronounce themselves versatile with a juicy pop of unmistakable flavor, lending themselves to what I dare call cornbread nouvelle.  Pair with a big green salad and a simple grilled fish to enjoy summer's waning bearings in a light and yet still unrestrained way.

Friday, August 3, 2012

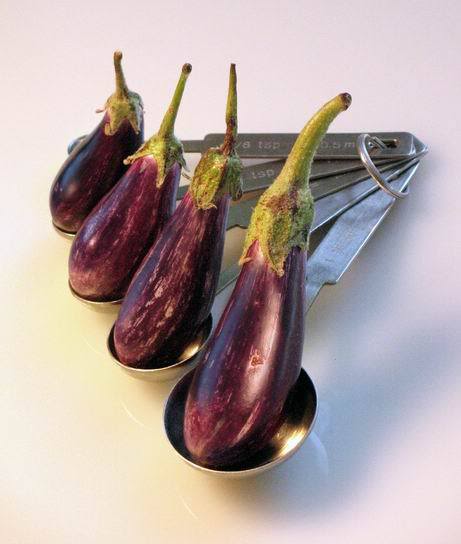
Vegivore Eats | Roasted, Stuffed Fairy Tale Eggplant

Fairy Tale eggplants are named as such because you feel like a giant when you're dealing with these petite little fruits.  I just made that up, being all glib about fairy tale references and what have you, but seriously -- when I saw these at the Hutchins Farm (Concord, MA) stand this week there was no second thought about bringing 'em home with me. 

photo credit: Figs With Bri (because I got right into mine and then audibly swore because I meant to photograph them first.  Look -- Bri's fit in measuring spoons...AW)

This Japanese variety is a luscious, stripey lavender, only a few inches in size, hardy and still delicate.  The insides are creamy eggshell white and when cooked correctly literally melt in your mouth.  Not at all bitter or seeded in the way that their bigger counterparts are.  No salting or heavy cooking required.  Tender, slender, plump and sweet.

Having never dealt with this hybrid specimen of eggplant before this, I figured I would attempt to treat them as I would the larger Italian varieties.  Once I realized that a quick roast (literally 5 minutes) would help that small amount of inner flesh pop right out with a teaspoon -- I had the idea in my head to stuff 'em like I would the big guys.  Tiny little two-bite appetizers of meaty mushroom and eggplant, mild chile, a pop of lemon, herbed bread crumbs for texture and dimension and a heady dose of cheese and shallot -- completely irresistible.


Roasted, Stuffed Fairy Tale Eggplant

Preheat your oven to 400.

Halve a pound of these miniature lil eggplant pretties.*  Arrange them cut side down on a foil-lined baking sheet and drizzle some olive oil over them; skate them around in the excess.  Pop in the oven for 5 minutes or so, then remove and set aside to cool while you deal with the other ingredients.

Finely dice: a shallot, Anaheim chile and two trumpet mushrooms.  Saute in oil over medium-low with salt and pepper until the mushrooms have released their liquid and everything is generally cooked.  Set aside.

Your eggplants should be cool enough to handle at this point.  Grasp them as best you can with their oily skins and scoop out the flesh from the middles, creating a divot large enough to fill but not so large that you damage the structure of your, uh, vessel (for lack of better word).

Coarsely chop the eggplant pulp and toss with your mushroom mixture.  Add a tablespoon or two of herbed bread crumbs (I food-process a few bread ends with garlic, rosemary and basil to make a surplus) and a generous squeeze of lemon.  Fold all ingredients together to create your filling.

Using a teaspoon (or your fingers, like I do), stuff each eggplant as much as you can with the filling.  Top with grated Romano cheese and put back in the oven to slightly melt the cheese and heat everything through, another +/- 5 minutes,

[ Arrange on a platter; "ooh" and "ahh"!  Eat in one or a few bites, but leave the stems and leaves...they're just decorative. ]

.....

* PRO TIP: Any variety of eggplant will oxidize almost immediately after being cut, turning the flesh brown and generally making for a super-gross experience.  To combat (and for the most part prevent) this, float the cut eggplants in a bowl of cold water spiked with something acidic like apple cider vinegar or lemon juice.

Thursday, July 26, 2012

Vegivore Eats | Stone Fruit Salsa (by Julia)

The summer hand fruit selection is all about stone fruits: peaches, plums, nectarines, and apricots.  The markets are literally overflowing, and once I buy a pound of one thing or another I can barely keep up...the fruit ripens to juicy excess seemingly right before my eyes.

I'll admit, I get wary of fruits like these; raw and sitting in my hanging basket hoping to be snatched up for a quick snack.  It just never seems to happen for me.  Just is not my go-to.  I suppose that, once you've bitten into an overripe peach, mealy and tasting of bad wine -- it's hard to get back on that horse. Yet I can't just walk away from the mounds of beautiful fruit at farm stands and farmer's market.  So here we are.

Typically I resort to baking a buckle, crisp or some other sort of hot goodie with it, or slicing and freezing for later smoothie use.  The other day though, upon lugging home a bunch of Shiro plums and white nectarines from Kimball Fruit Farm (Pepperell, MA), I plunked the bags down on the counter and surveyed my tiny galley kitchen.  It was already in complete disarray from cooking for a client.  There was no way, after the day I'd had, that A) I was about to clean and disinfect that whole room, just to muck it up again with bowls and spatulas galore B) sweat with the oven on C) deal with the steps of making a freakin' buckle!

I settled on salsa.  Lovely, minimal effort (and dish-use), cool fruit salsa.  The colors and flavors of local nectarines and plums kicked up with the spice of hot pepper, the pop of citrus, cilantro and ginger, the pungent grounding of garlic and the hearty cold of a seedless cucumber.  Sweet heat, refreshing and tart.  This one's a keeper.

I'll admit, I don't measure when making my salsas (though I did put together a recipe below for those not like me).  I add and taste, add a bit more, taste, use what I have and not much else.  Bold flavors complement the simplicity of what's going on here -- and sweet potato chips from Food Should Taste Good (Needham, MA) just push the whole snack over the top.  At its best about an hour after you make it, this bowl of goodness is unusual, sunny, bountiful and hits all the high notes.


STONE FRUIT SALSA
serves just you, cuz you're not gonna wanna share
(just kidding, serves 3-4)

4 ripe plums, washed but unpeeled, pitted and cubed
4 ripe nectarines, washed but unpeeled, pitted and cubed
1/2 seedless cuke, julienne or dice (avo would work well, too)
1/2 red onion, thinly sliced
2"-3" thumb of fresh ginger, peeled* and finely grated
1 clove garlic, minced
juice of 1/2 lime
1/2 serrano pepper, seeded and minced
2T cilantro, leaves only, minced
coarse salt and black pepper to taste
opt: sugar as needed if your fruit is too tart

Combine all ingredients.  
Let it macerate, covered, in the fridge for about an hour, then enjoy with chips, crusty bread (like a weirdo's bruschetta), or a spoon!

...

PRO TIP: Even though this column focuses on fresh, seasonal vegetarian dishes (hence, Vegivore Eats), I cannot resist telling you how amazing this stuff is with grilled chicken!


Thursday, July 19, 2012

Vegivore Eats | Boozy Orange-Carrot Tea Bread

Initially I only wanted a quick snack. I went to the kitchen to peruse the offerings in there and found in my crisper some leftover carrots from Monday's farmer's market trip. What happened next is a bit of a frenetic culinary blur...and I ended up with a loaf of perfectly golden, heaven-scented Boozy Orange-Carrot tea bread exiting my oven a relatively short while later.

These carrots, from one of my farmstand favorites (Dick's Market Garden), were just thin enough to be a pain in the butt to grate and yet just tender and perfect enough to be worth the trouble.  They added to the batter an earthy sweetness that offset the deep, robust flavors of the liquor and brown sugar.


Dried, sweetened cranberries added some chewy tartness to the finished loaf, and sliced almonds offered some crunch, along with a last-minute handful of dry-roasted sunflower seeds for a nutty, complementary umami.  Zested orange peel at the end brightened up the whole thing.

Thursday, July 12, 2012

Vegivore Eats | Zucchini Pizza Rounds

If you're anything like me and just HAVE to take home that 6-pound zucchini at the farmer's market, then you've probably run into the problem of what the hell to do with it all.  Perhaps you grate half of it and make a bunch of zucchini bread.  But what to do with the rest? ...I know!  I know!  More zucchini bread!  Zucchini bread for life!

But we can do better than that.  While a good zucchini bread is great and all, and might even make you a few friends, one cannot live on zucchini bread alone.  Time to think beyond zucchini bread.

Low in calories and high in vitamin A, this technically-a-fruit "vegetable" has a lot to offer.  It'll support your vision, bones and immune function.  Plus, the potential size alone of these summer monsters lends itself to many a flexible culinary option -- even if a bumper crop challenges the ingenuity of the cook after awhile.  What about using a peeler to make a raw squash "pasta"?  Grilling them with herbs and garlic?  Halving them, scooping out the middles and  using it to make twice-stuffed zucchinis? Breading and baking wedges to get a sort of zucchini french fry? There are an abundance of recipes that come to mind for normal supermarket-sized zucchini, but my best quick recipe for the big guys is for zucchini pizza rounds.  They're pretty to look at, an open invitation for recipe-riffing and are even easier to whip up for almost any meal.

Zucchini bat from Linabella's Gourmet Garlic Farm (Oakham, MA), "Red Gravy" from Valicenti Organico (Hollis, NH) plus some oregano to take it from pasta to pizza, grated sharp cheddar from Cabot Creamery (Cabot, VT), garlic powder, caramelized oyster mushrooms and Vidalia onion, some Pecorino Romano, black pepper and fresh basil from Dick's Market Garden (Lunenberg, MA).

ZUCCHINI PIZZA ROUNDS

Turn on your oven's broiler.

Slice from your giant honkin' zucchini rounds about 1-2" thick (depending on how much you like zucchini, really, any width is okay).  Place them on a foil-lined baking sheet, and broil each side about a minute and a half.  You're looking to dry your zucchini rounds, not cook them...take them out early if your slices are looking a little wilted, or if they've gone the other way and are browning (or worse, burning).

Lift up each round and sprinkle some fine corn meal on the foil underneath before returning them to their places.  This will prevent any sticking; sort of lifts them up from the pan ever so slightly, plus gives this delicious crunchy finish to each bite.

Let cool and then top with whatever your heart desires.

Pop them back under the broiler for 2-3 minutes, or until you're content with the result.

The green of the zukes after broiling should be brilliant, the flesh soft and yet hearty enough to withstand many a topping.  There is no wrong way to make a pizza -- -- make these little veg pizzas yours and enjoy them in good health.

.....

PRO TIP: to store your zucchini for maximum longevity, keep it in a plastic bag (with a few holes poked in it) in the crisper drawer of the refrigerator.  Turn occasionally to avoid browning/bruising on the bottom.

Thursday, July 5, 2012

Vegivore Eats | Farmer's Market Mac & Cheese

It starts with a bechamel -- warm milk thickened with cooked butter and flour, whisked constantly by the cook patiently awaiting the magic about to happen.  Spices and seasonings are added, then grated cheeses.  A moment later the most richly intense cheese sauce ever is finished. Combined with parboiled pasta and the week's farmer's market haul, and after a sprinkle of bread crumbs and a relatively quick turn in the oven, it's ready: completely heavenly macaroni and cheese.

Crunchy and creamy, as good cold as it is hot, and blissfully reheat-able -- there is nothing not to love here.

With bathing suit season and higher temps upon us, I know, I know, it's not fair to post this recipe!  I wouldn't call it healthy or light, and does require some attention and time in the warm kitchen  -- but the recipe will accommodate most any vegetable (the fresher the better, as with any ingredient), substitutions and experimentation are encouraged and it's a good gourmet go-to for any mac and cheese aficionado. ...like I need to twist your arm!

FARMER'S MARKET MACARONI AND CHEESE
serves 4 
(or 2 if you're anything like my boyfriend and I)

The stars of today's recipe:

fat n' luscious shell peas (Dick's Market Garden, Lunenberg, MA) and brilliantly sunny golden zucchini (Hutchins Farm, Concord, MA)


Ingredients:

2T butter, divided
2 slices bread
1 clove garlic
1T olive oil 
1 1/2T butter  
1 1/3c whole milk (plus extra to thin sauce), room temp
1/8c flour
1/2T kosher salt (plus extra for crumbs and pasta water)
 1/4t ground nutmeg
1t hot sauce
1/2t smoked paprika
1/4t black pepper
1t dried (or 1/2t fresh) oregano
1 2/3c grated white cheddar (the sharper the better), divided
1/2c cubed Gruyere cheese
1/4 lb pasta (shells and spirals work best)
fresh vegetables -- approximately 2 cups -- small dice, ribbons or grated

First, spray an 8x8 pan with PAM.  Set aside.

Then, make your bread crumbs.  Preheat the oven to 350.  In a food processor, buzz together 1/2T of the butter, the garlic clove, the bread slices and the olive oil, til fine.  Pop in the oven on a tinfoil-lined baking sheet and bake til crispy, stirring around occasionally, about 15 minutes.  
Set aside to cool, keep the oven on.

Parboil your pasta -- this means to cook as usual, except for a shorter amount of time (it will finish cooking in the oven).  I usually aim for half the time indicated on the package.  
Set aside.

Warm the milk in the microwave for 30 seconds.  In a large saucepan, melt the butter over medium heat.  Gradually whisk in the flour and cook the resulting roux for about a minute 30, stirring constantly.  Add the warmed milk in splashes, whisking vigorously.  At first it looks/sounds like you've done something very wrong.  You haven't, keep stirring.  When all the milk is in, simmer for about 8 minutes, stirring often, until thickened and starting to bubble (don't boil, though!).  Turn the heat down to low, and quickly add the salt, nutmeg, hot sauce, paprika, pepper and oregano.  Then stir in 1 1/3 cups of the cheddar and all the Gruyere.  If it comes together as a giant ball of cheese, simply add extra warm milk a splash at a time until the desired consistency is reached.  I usually need 2-3 splashes.  
Set the sauce aside.

Now, address your farmer's market goods.  Many things will need a quick cook-through before heading into the casserole.  I used shell peas, which needed a quick shock, but I grated the zucchini -- the smaller, delicate pieces didn't need any pre-cooking.  If you have greens, this really depends on the thickness we are talking -- baby spinach wouldn't need pre-cooking, Swiss chard would.  As logic would dictate, smaller, uniform pieces will cook more quickly and evenly (and be easier to eat).  In general, use your judgment.  Would you eat the vegetable raw or only partially cooked?  You might have to in the end, so consider this!

When your vegetables are ready, it's time to put together the casserole.  
(Gently reheat your sauce if it's gotten gluey, and) Add your pasta and vegetables to the cheese sauce and mix gently, then pour out the pan into the prepared baking dish.  Top the mixture with the remaining 1/3c grated sharp cheddar, then with the bread crumbs.  Bake uncovered in the still-heated oven for about 30 minutes, then cool 5-10 minutes in the pan on a wire rack before serving.  Serve with kosher (or garlic) salt and cracked black pepper over the top.


PRO TIP: make this recipe gluten-free by using rice bread, flour and pasta (my clients prefer Food For Life, Gluten-Free Pantry and DeBoles brands, respectively, found at Whole Foods or Harvest Co-op).